Introduction
So you want to upgrade your vSphere environment to vSphere 6? Good call, because vSphere 6 has a lot improvements and enhancements compared to vSphere 5. Keep in mind that vSphere 6 has some architectural changes that need to be considered during the design and deployment phase. This particular article will not address the improvements, enhancements nor the architectural changes.
However this article will address a challenge I encountered while planning a migration strategy on how to migrate ESXi hosts and Virtual Machines from vSphere 5 to vSphere 6. I have done a few vCenter migrations, but what made this one different from the others, are the Virtual Machines protected with vSphere Replication for Disaster Recovery or datacenter migration reasons.
Recommendation
Because the architecture in vSphere 6 has changed I would recommend to install a new vCenter server with a fresh database (This is something I do every major version update (e.g. 5 to 6)). Installing a new vCenter server also gives you the opportunity to use the latest build of the operating systems and applications (e.g. Windows, SQL, Oracle).
The Challenge
If you disconnect an ESXi host that contains VM’s that are protected by vSphere Replication, the old vCenter will ‘unconfigured’ the replicated VM. Meaning it will cleanup all the files, including the SEED disk VMDK files. These SEED disk VMDK files potentially took ages to replicate to another datacenter over a (small) WAN link. Therefore you preferably do not want to lose the SEED disk VMDK files! So is it hopeless? Nope, definitely not! Please check out the below instruction how to bypass or trick your old vCenter from deleting the SEED disk VMDK files. Next you can safely add the ESXi host the new vCenter server and reconfigure the vSphere Replications and use the SEED disks again.
| Required Action | Screenshot |
|---|---|
| Old vCenter 1. Make an Inventory of the vSphere Replicated Virtual Machines and their target data stores are, that contain the SEED disk VMDK files. 2. Browse to the target data store, that contains the SEED disks. |  |
| 3. Select the folder of the Virtual Machine that contains the SEED disk VMDK files. 4. Rename the folder to _OLD. 5. If all folders have been renamed, continue with migration of the ESXi hosts |  |
| 6. Select the ESXi host and disconnect it. | 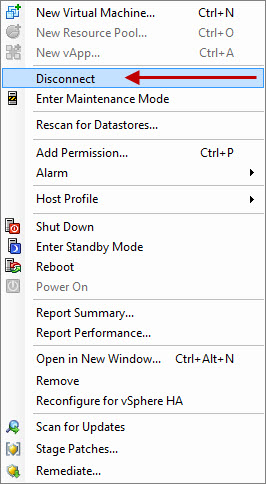 |
| 7. Select the ESXi host and remove it. |  |
| 8. If the ESXi host contains a VM that is protected with vSphere replication. It will try to clean up the replication and deleted the SEED disks. However it will generated an error that the files can’t be deleted, because the files can’t be found, due to the folder rename we did earlier. |  |
| New vCenter 9. Add the ESXi host to the inventory, this will also import all VM’s running on it. | 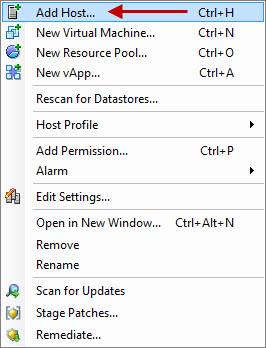 |
| 10. Browse to the target data store again, that contains the SEED disks. 11. Rename the folder with _OLD to the original name. |  |
| 12. Select the VM that needs to be protected again with vSphere Replication. 13. Configure the Replication. |  |
| 14. Replicate to a vCenter Server (if applicable). |  |
| 15. Select the target site. | 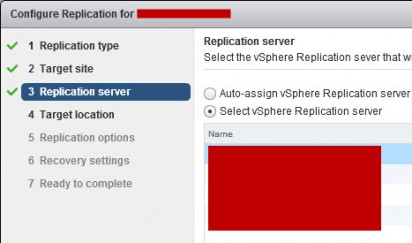 |
| 16. Select the replication server, which will be replicating the VM. |  |
| 17. Select the data store that contains the SEED disks. 18. Select the folder of the VM you want to replicate. | 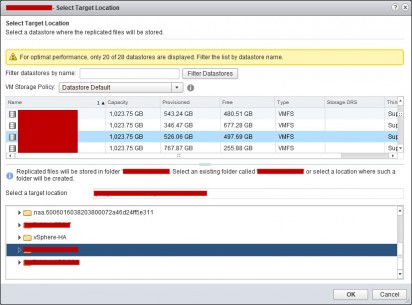 |
| 19. A message will state the folder already exists. Which is good because we need the SEED disks. 20. Click Use existing. |  |
| 21. Check all the hard disks, if seed disks are found. Otherwise you need to browse to them. This occurs when some hard disks are located across multiple data stores. You have to select them individually. 22. Once all disks are stating ‘USE SEED’. Select ‘USE SEED’ or ‘USE ALL SEEDS’. |  |
| 23. Select the needed replication options. |  |
| 24. Select the interval the VM needs to sync its delta’s across. | 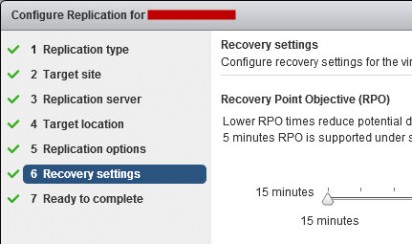 |