Introduction
Virtualization gives us the benefit to better utilize hardware resources. In the past applications only used a small piece of hardware resources. Applying a hypervisor on top of the hardware enabled us to run multiple applications/servers on the same piece of hardware therefore better utilizing the hardware.
However there are applications demanding huge amounts of resources to perform well. Immediately we can start a discussion whether it’s better to keep these applications on physical hardware instead of virtualizing them. Virtualizing these types of applications still bring lots advantages like HA (high availability) in case of hardware failure, but also disaster recovery can be easier to implement in a virtual environment (if the application doesn’t provide an easy out of the box DR ability).
How SR-IOV ties in
SR-IOV or Single-Root I/O Virtualization bypasses the very well-known vSwitch. It basically allows a virtual machine to directly communicate with the network adapter instead of the vSwitch. Eliminating the vSwitch will decrease latency. The following VIDEO explains SR-IOV in more detail.
Enabling SR-IOV
Step 1: BIOS
| Required Action |
|---|
| 1. Enable the SR-IOV feature in the advanced section of the BIOS. 2. Enable Advanced Mode Support for the Emulex network card in the BIOS (HOW TO). |
Step 2: Flex Fabric
| Required Action | Screenshot |
|---|---|
| 1. Power down the virtual machine. 2. Create a server profile. 3. NIC (Port) 1 & 2 are meant for ESXi host management only. 4. NIC (Port) 3 & 4 are meant for virtual machine production network. 5. Start the server so the new flex fabric settings are applied during boot sequence. NOTE 1: Don’t use NIC (Port) 1 & 2 for virtual machine production, because SR-IOV in this case uses all above the first 2. NOTE 2: Make sure that the production VLAN or the VLAN were the application resides is on a separate VLAN than the ESXi management of your ESXi host. Otherwise the SR-IOV implementation will not be successful. |  |
| 6. Enable the SR-IOV option for the NIC(s) needed in the server profile. 7. Click the edit button. | 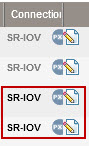 |
| 8. The AUTO setting will enable 24 virtual functions for SR-IOV. If more VFs are needed the option Custom can be selected. 9. For Boot order use the default USE-BIOS setting. 10. Click OK. | 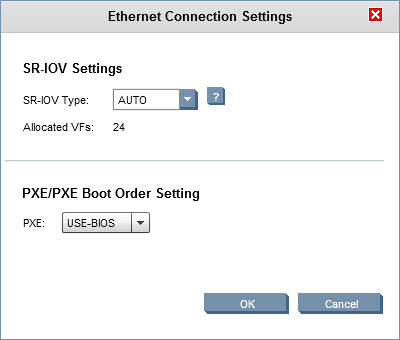 |
Step 3: ESXi Configuration
| Required Action | Screenshot |
|---|---|
| 1. Enable SSH on your ESXi host. 2. Connect to your ESXi host. 3. Type: esxcli network nic list. 4. This will display all the available NIC’s and which driver is used. 5. The first two NIC’s are used for ESXi management and NIC’s 2 & 3 (3 & 4 in Virtual Connect) are used for virtual machine production network. | 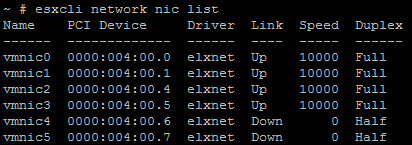 |
| 6. Run the following command to view the maximum number of VF’s (virtual functions) can be activated for SR-IOV: 7. esxcli system module parameters list -m elxnet | grep max_vfs. 8. For the setup needed in this example only 5 VF’s are needed. |  |
| 9. Enable SR-IOV by running the following command: 10. esxcli system module parameters set --module elxnet --parameter-string=max_vfs=0,0,5,5. 11. Reboot the ESXi host. |  |
| 12. When the ESXi host is up and running click the configuration tab. 13. On the left side of the menu click Advanced Settings. 14. If the commands were successfully applied the VF’s become visible and ready for use. 15. Since there are two flex fabric switches (redundancy) two VF’s have to be installed per virtual machine. Also keep in mind that if HA is needed you allocate unique VF numbers to a virtual machine. Make sure no duplicate VF numbers are used across virtual machines in the same cluster on different hosts. | 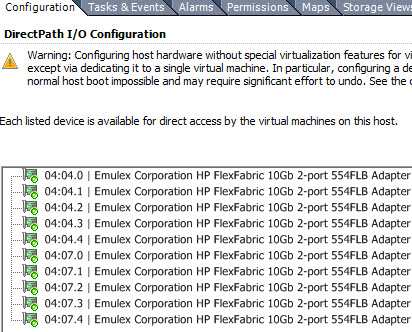 |
Step 4: Virtual Machine Configuration
| Required Action | Screenshot |
|---|---|
| 1. Make a note of the IP settings of the VM. 2. Set the current network adapter to DHCP so the IP settings are correctly cleaned from the registry. 3. Delete the traditional network adapter from the virtual machine. 4. Add two PCI adapters, connecting to two different switch ports for redundancy. 5. When adding the PCI adapters click ‘Reserve Memory’. |  |
| 6. On the Windows Server 2012 virtual machine op the Server Manager. 7. Click Local Server. 8. Two pciPassthru devices are displayed, which need to be teamed. 9. Click the NIC Teaming option Enabled. |  |
| 10. NIC Teaming opens, select both adapters. 11. Right click and select Add to New Team. | 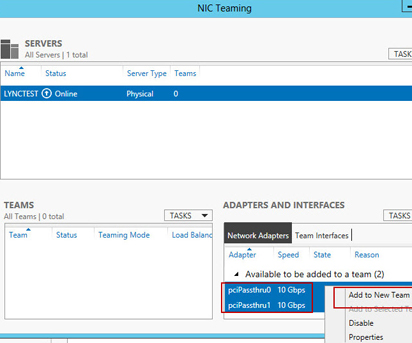 |
| 12. Give the Team a name. 13. Select both adapters. 14. Select one adapter to be standby. 15. Click OK. | 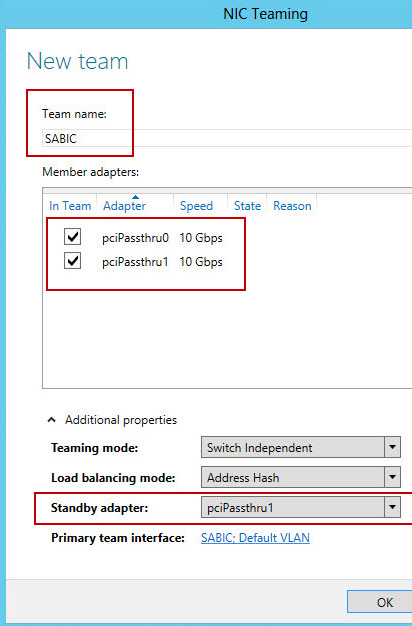 |
| 16. An error might occur selecting the correct standby adapter. 17. Disabled both adapters. | 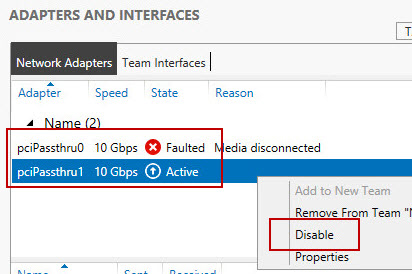 |
| 18. Enable the adapter that needs to be active. Wait for the state too become green/active. 19. Enable the second adapter, which now will be green/standby. |  |
| 20. Configure the IP settings for the new Team network. 21. Configuration done, you are now communicating via SR-IOV. | 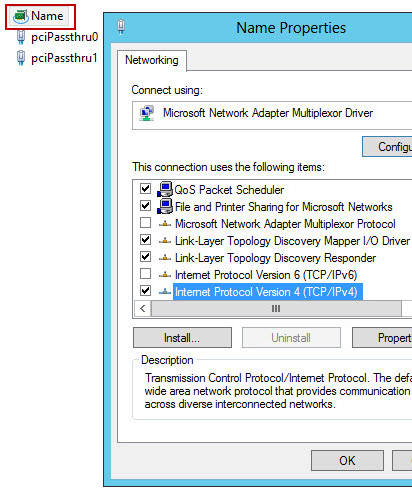 |
Downsides SR-IOV:
- You can no longer suspend a virtual machine.
- You can no longer vMotion a virtual machine.
- You can no longer take or restore snapshots of a virtual machine.
- You can no longer hot add CPU or RAM (shutdown the VM, add CPU or RAM and power on the VM).
- If a cluster is available, HA can recover the VM but is not able to start because the wrong PCI is mapped. Therefore a manual action is required:
- Delete the PCI devices of the old ESXi host.
- Add the PCI devices of the new ESXi host with preferably the same ID’s, so no reconfiguration in the VM is needed.
Prerequisites:
- Minimal HP Flex Fabric firmware: 4.11.
- Minimal HP ProLiant Blade 460c G8 firmware: I31.
- VMware Enterprise Plus License.
- Enable SR-IOV in the BIOS.
- Make sure the Advanced Mode Support is Enabled for the Emulex network card (HOW TO).
This article is based upon the following hardware configuration:
- HP Blade C Enclosure.
- HP ProLiant Blade 460c G8.
- HP Flex Fabric.
- VMware ESXi 5.5 U2 (special HP VMware build, includes all the correct drivers needed for SR-IOV, if incorrect drivers are used the settings will work only temporarily and will not be persistent).